Intro: Demystifying Commercial Sewing Patterns
For many beginning cosplayers, the prospect of working with commercial sewing patterns can be intimidating, with their seemingly incomprehensible collection of lines, symbols, and abbreviations. However, these patterns are actually logical, well-organized tools that become straightforward once you understand their structure and purpose.
Commercial sewing patterns are essentially detailed blueprints that guide you through the process of creating a specific garment style. They’ve been refined over decades to provide clear instructions for sewers of all skill levels, and learning to read them is a fundamental skill that opens up countless possibilities for cosplay costume creation. With a basic understanding of pattern components and symbols, you’ll be able to tackle patterns labeled as “Easy” or “Beginner” with confidence.
Anatomy of a Pattern Envelope
The pattern envelope is your first source of information about any sewing project, containing essential details that help you determine if the pattern is suitable for your skill level and intended project. Understanding how to read this information ensures you select appropriate patterns and have realistic expectations about the construction process.
Front Panel Information
Front Panel Information
Front Panel Information
The front of a commercial pattern envelope is designed to showcase the finished garments and provide at-a-glance information about the pattern’s contents and requirements. This visual presentation helps you quickly assess whether the pattern matches your project goals and skill level.
Essential front panel elements:
- Color photographs of finished garments in various views
- Pattern number and name for identification
- Size range available on this pattern
- Difficulty rating (Easy, Average, Experienced)
- Notions and fabric requirements
- Pattern piece diagram showing included components
Pay particular attention to the difficulty rating and required notions list. “Easy” patterns typically have fewer pieces, simpler construction techniques, and minimal fitting requirements, making them ideal for beginners. The notions list tells you what additional supplies you’ll need beyond fabric, such as zippers, buttons, or interfacing.
Pro Tip:
When selecting your first few patterns, choose ones with simple silhouettes and minimal closures (avoid patterns requiring invisible zippers or complex buttonhole techniques initially). Look for patterns with clear, well-lit photographs that show construction details, as these will be most helpful when you’re learning.
Back Panel Details
Back Panel Details
Back Panel Details
The back panel of a pattern envelope contains detailed technical information that’s crucial for successful pattern selection and project planning. This information helps you determine if you have the necessary skills and materials before beginning construction.
Important back panel information:
- Detailed fabric requirements by size and view
- Finished garment measurements chart
- Pattern piece layout diagram
- Step-by-step instruction overview
- Suggested fabrics and notions
- Copyright and company information
The finished garment measurements chart is particularly important for cosplay applications, as it allows you to determine if pattern alterations will be necessary to achieve your character’s specific silhouette. Compare these measurements to your own body measurements and consider how costume elements like padding or undergarments might affect the fit.
Inside the Packet: What’s Included and How to Use It
Once you’ve purchased a pattern and opened the envelope, you’ll find several components inside that work together to guide you through the construction process. Understanding what each component contains and how to use them effectively is essential for successful sewing projects.
Instruction Sheet Overview
Instruction Sheet Overview
Instruction Sheet Overview
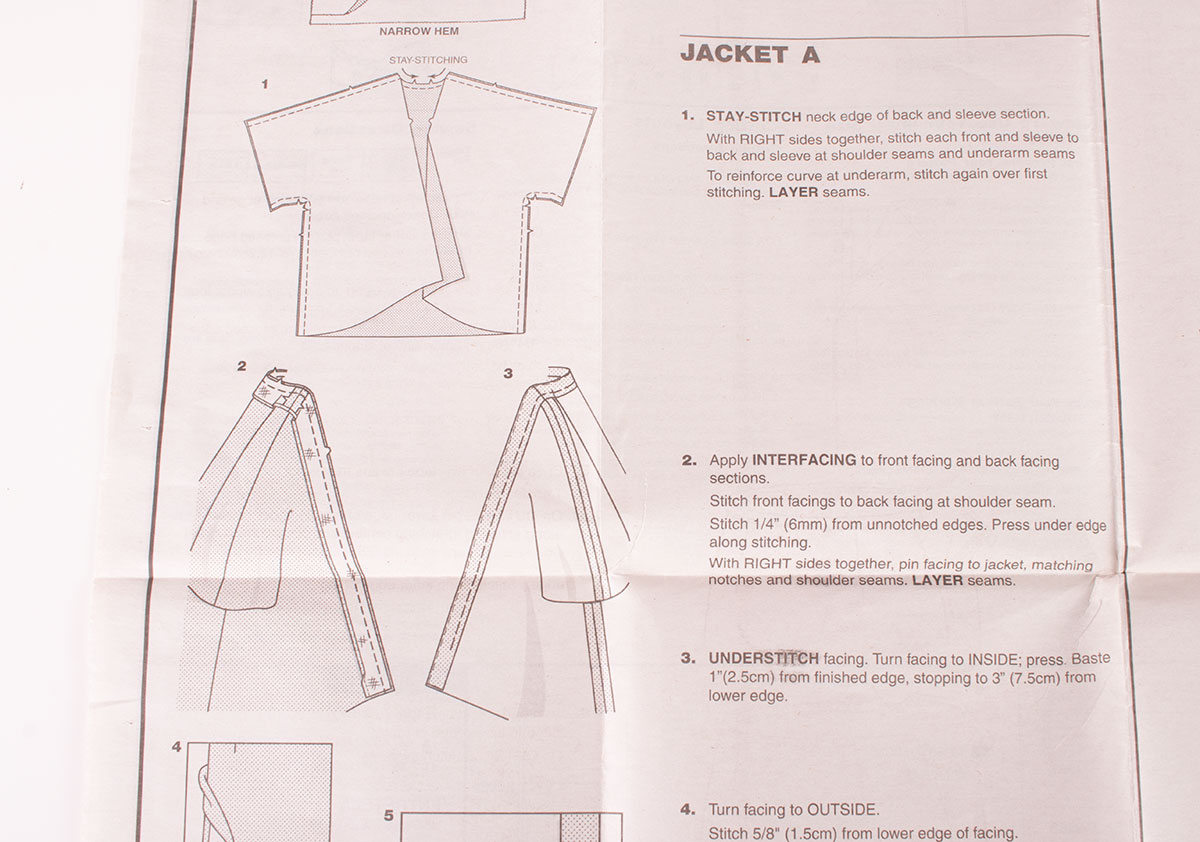
The instruction sheet is the roadmap for your sewing project, providing step-by-step guidance through the construction process with detailed illustrations and technical information. This document contains all the information you need to successfully complete your garment if followed carefully.
Instruction sheet components:
- Pattern layout guide for cutting fabric pieces
- Step-by-step construction instructions with illustrations
- Measurement chart and sizing information
- Pattern piece identification guide
- Troubleshooting tips and fitting advice
- Notions and tool requirements list
Before beginning any project, read through the entire instruction sheet to understand the construction sequence and identify any steps that might require special techniques or tools. This preview helps you prepare adequately and avoid surprises mid-project when you might not have the necessary supplies or skills.
Tissue Paper Pattern Pieces
Tissue Paper Pattern Pieces
Tissue Paper Pattern Pieces
The tissue paper pattern pieces are the physical templates you’ll use to cut your fabric, marked with essential information for proper alignment and construction. These pieces are fragile and require careful handling to maintain their accuracy throughout your project.
Pattern piece elements to identify:
- Piece number for identification and instruction matching
- Grainline arrow indicating fabric direction
- Cutting lines and seam allowances
- Notches and matching points for piece alignment
- Dart markings and shaping lines
- Size lines for multi-size patterns
Handle pattern pieces carefully to avoid tears or wrinkles that could affect accuracy. Many sewers transfer patterns to cardstock or freezer paper for durability, especially when working on complex projects or when pieces will be used repeatedly. Number each piece as you remove it from the packet to ensure nothing gets lost during the cutting process.
Pro Tip:
Before cutting into your fashion fabric, make a test garment (muslin) using inexpensive fabric to verify fit and familiarize yourself with the construction process. This practice version allows you to identify and correct any fitting issues or technique challenges without risking your cosplay materials.
Decoding the Markings: Common Symbols and Their Meanings
Commercial sewing patterns use a standardized system of symbols and markings to convey essential construction information efficiently. Understanding these symbols allows you to interpret pattern instructions accurately and construct garments that fit properly and look professional.
Essential Pattern Symbols
Essential Pattern Symbols
Essential Pattern Symbols
Pattern symbols provide visual shorthand for construction information that would be cumbersome to explain in words. These symbols appear on both the tissue paper pieces and in the instruction illustrations, creating a consistent language for sewing information.
Key symbols to recognize:
- Grainline arrow: Indicates direction of fabric grain
- Notches: Small triangles for matching piece edges
- Dots: Mark specific points for matching or construction
- Seam allowance lines: Indicate stitching distances
- Cutting lines: Show where to cut fabric pieces
- Fold lines: Indicate where fabric should be folded
Pay special attention to notch placement and shape, as these details are crucial for matching pieces correctly. Some patterns use single notches, while others use double notches or different shapes to indicate different matching points. Consistency in interpreting these symbols ensures that your garment pieces align properly during construction.
Understanding Pattern Notations
Understanding Pattern Notations
Understanding Pattern Notations
Beyond symbols, patterns use specific notations and abbreviations to convey measurements, construction techniques, and sizing information. These notations follow industry standards that are consistent across different pattern companies, making it easier to transfer skills between different patterns.
Common notations and abbreviations:
- SA: Seam allowance
- CF: Center front
- CB: Center back
- RS: Right side (outside) of fabric
- WS: Wrong side (inside) of fabric
- Selvage: Finished edge of fabric
Keep a notation reference sheet handy when working with new patterns, especially if you’re still learning the standard abbreviations. Most pattern companies include a notation guide in their instruction sheets, but having a separate reference can speed up your work and prevent mistakes caused by misinterpreting markings.
Taking Measurements & Choosing a Size
Selecting the correct pattern size is crucial for achieving a good fit and avoiding the frustration of garments that are too tight, too loose, or require extensive alterations. Proper measurement technique and size selection form the foundation of successful sewing projects.
Essential Body Measurements
Essential Body Measurements
Essential Body Measurements
Accurate body measurements are the starting point for any successful sewing project, providing the information needed to select patterns that will fit your body proportions. Taking measurements correctly requires patience and attention to detail, but this investment pays dividends in better-fitting garments.
Key measurements for most patterns:
- Bust/Chest: Around the fullest part
- Waist: Natural waistline or desired garment waist
- Hips: Around the fullest part
- Shoulder width: From shoulder point to shoulder point
- Arm length: Shoulder to wrist
- Torso length: Shoulder to desired hemline
Wear form-fitting clothing or undergarments when measuring, and use a flexible measuring tape held parallel to the floor. Don’t pull the tape too tight – it should fit snugly without compressing the area being measured. Have someone help with measurements that are difficult to reach, as accuracy is more important than modesty during this process.
Choosing the Right Size
Choosing the Right Size
Choosing the Right Size
Pattern sizing differs significantly from ready-to-wear clothing sizes, with most pattern companies using standardized measurements that may not correspond to your typical clothing size. Understanding how to interpret pattern size charts prevents the common mistake of ordering patterns based on clothing size rather than measurements.
Size selection process:
- Compare your measurements to the pattern size chart
- Choose size based on your largest measurement
- Consider pattern design and intended fit
- Account for cosplay-specific modifications
- Plan for any necessary alterations
For cosplay applications, you may need to adjust your size selection to accommodate costume elements like padding, armor, or specific character proportions. A garment that fits perfectly for everyday wear might appear too loose when worn over cosplay undergarments or too tight when modified for character accuracy.
Pro Tip:
Keep a personal measurement record card with your current measurements and pattern size preferences. This reference saves time when selecting new patterns and helps you track how your measurements change over time. Include notes about successful patterns and any adjustments you typically need to make.
Conclusion: Start with Beginner Patterns and Build Your Skills
Learning to read and use commercial sewing patterns is a skill that develops over time through practice and experience. Beginning with simple patterns and gradually progressing to more complex designs allows you to build confidence and technique without becoming overwhelmed by technical challenges.
For your first few projects, look for patterns specifically labeled as “Easy” or “Beginner” with simple silhouettes, minimal pieces, and straightforward construction techniques. Popular beginner-friendly pattern companies include Simplicity, McCalls, and Butterick, all of which offer extensive lines of patterns suitable for new sewers.
Suggested first projects for beginning cosplayers:
- Simple A-line skirt with elastic waist
- Basic tunic or poncho-style top
- Elastic-waist pants or simple trousers
- Pillowcase or drawstring dress
- Simple cape or cloak with straight seams
These projects teach fundamental sewing skills like straight stitching, seam finishing, hemming, and basic shaping while producing wearable cosplay elements that can be incorporated into more complex costumes. As your skills develop, you can progress to patterns with zippers, set-in sleeves, collars, and other intermediate techniques.
Consider attending one of our community’s sewing workshops, where experienced members provide hands-on instruction and guidance for beginners learning to work with patterns. These sessions offer valuable opportunities to ask questions, practice techniques, and receive personalized feedback on your progress in a supportive environment.
Remember that every experienced sewer was once a beginner who struggled with pattern symbols and confusing instructions. Be patient with yourself as you learn, and don’t hesitate to make mistakes – they’re an essential part of the learning process. With practice and persistence, you’ll soon find that commercial sewing patterns are valuable tools that open up endless possibilities for creating custom cosplay costumes and garments.
Most importantly, have fun with the process of learning to create wearable art through sewing. Each successful project builds your confidence and skills while producing garments that express your creativity and bring your favorite characters to life. The satisfaction of wearing something you’ve created yourself adds an extra layer of enjoyment to your cosplay experiences that’s hard to match with purchased costumes.
